Wednesday, August 15, 2012

Using ArcPad Training

We are proposing to run a number of Using ArcPad courses around Australia in the coming months.

The current courses proposed are:
  • Adelaide - In late September
  • Albury/Wodonga - In early October
  • Brisbane - In late October

Further information on the course can be viewed at the RIA Mobile GIS website here.

RIA Mobile GIS run scheduled and onsite training courses for ESRI software throughout Australia. Please feel free to contact us if you would like to schedule a training course for your organisation, or in your area.

Tuesday, August 14, 2012

GeoDrive - GIS video integration

Over the past few weeks I have been working on an exciting new application in the world of mobile GIS that I wanted to share with you. In a nutshell, we are taking HD geotagged video footage, and integrating it with common mapping applications such as ArcPad, ArcMap and ArcGIS Explorer.

The application, GeoDrive, allows you to view the video footage, whilst outputting the spatial location of the current frame to the mapping applications. This means that you can view both the footage, and its location, at the same time. The applications are fully integrated; you can change the video and its position, and the location is updated in the map. Similarly, you can select a location on the map, and the video and position are located in the player. It is also possible to trigger events in the mapping application directly from the player. So, for example, you can click a button from the player, and a feature can be automatically captured in the mapping application at the current location.

Think of the performance and safety benefits of this. Imagine you are a council inspector and your job is to drive the roads of your shire, inspecting all of the council's assets, checking for any defects and works that need completing. Typically what you would do is hop in your car, drive along until you see something untoward, park your car, jump out with your PDA/GPS and log the details. You then need to go back to the car, and take off again on the hunt for the next defect.

Now, imagine what you can do with GeoDrive. All you need to do is mount a video camera on a vehicle, and send someone out to drive the entire road network. You can then come back to the safety and comfort of the office, and view the footage that was captured. As it is all spatially located, and fully integrated with your GIS application, you can log any defects directly from the footage. Simple!

GeoDrive has a range of applications, ranging from routine management surveys of linear assets (pipelines, roads, railways etc.) through to proof of work completion, quality control and asset collection.

A demonstration of GeoDrive in action can be viewed below:


GeoDrive can be used with any video camera, provided there is a way of linking the footage with spatial locations. There are a couple of ways of doing this: (1) using a video camera with an inbuilt GPS receiver; (2) using a standard video camera, and linking it to a data logging GPS receiver using GeoDrive post processing tools. We are also currently researching the viability of using accelerometers to position footage in places where GPS won't work, such as indoors and in pipelines.

The footage shown above utilised the first of these options, using the Contour GPS video camera (RRP $399 AUD). The camera was mounted on the inside of a car windscreen in bright, sunny conditions (hence the screen glare visible in parts of the footage). Being a rugged camera designed specifically for outdoor, action adventuring, these cameras can easily be mounted on the outside of vehicles to eliminate the glare and provide clearer footage. 

In fact, the cameras can be mounted just about anywhere, and taken just about anywhere. There is some pretty amazing sample footage available on the web - check out the Contour website for some samples. If you want a laugh, do a search for "fail". Some pretty funny stuff comes up. And remember, it is all research!

If you would like more details, or even a live online demonstration, please contact us at ContactUs@riamobilegis.com.au.

Wednesday, August 1, 2012

Introduction to ArcGIS 10 Training Courses

Man doing ArcGIS course with RIA
ArcGIS 10 training courses will be offered in Hobart and Adelaide. 

This is a great way to learn all you need to get started with ArcGIS.

Hobart
Dates of Course: 30 and 31 August 2012
Early Bird Date: Register before 14 August 2012.

For more information, registration and costs for Hobart then please click here

Adelaide
Dates of Course: 2 and 3 October 2012
Early Bird Date: Register before 3 September 2012.

For more information, registration and costs for Adelaide then please click here.

25% Discount

We have continued to run our courses for over 10 years now because past participants keep recommending them to new users. Please continue to help us by forwarding this email to someone who may be interested in attending an informative and enjoyable 2 days of learning all about ArcGIS.

Even if you have done the course before then why not come along for a refresher? There is a lot of exciting and useful new stuff in version 10.

Friday, November 18, 2011

Sydney to Hobart Sponsorship

RIA Mobile GIS is sponsoring Hobart boat Whistler in this years Sydney to Hobart.
As part of the crew I have been training for the race and updating the navigation equipment onboard that combines lots of NMEA strings into a Toughbook for optimal routing and navigation purposes. Of course there's also an ArcPad system onboard running on a handheld for backup purposes, Man Overboard and should we need to take something waterproof into a life raft!
Tonight is the qualifying race for the Sydney to Hobart race - The Maria Island Race.
180 nm, starting 7pm Friday night, finishing sometime Saturday night/Sunday morning.
This will be a good test of the new navigation equipment, new sails and wet weather gear.
You can follow our progress here.

Friday, July 8, 2011

Mobile GIS Hardware Review 2.0

In light of some changes to the hardware market for mobile GIS, a new and improved overview document has been prepared! This document is aimed at providing a concise and informative overview of the devices we recommend and sell, and look at their suitability for field and GIS data capture applications. Specifications and approximate pricing are included.

The document has changed substantially from its earlier incarnation, with some devices removed (such as the now discontinued HP iPaq) and others added. The new Motorola model, the MC65 is a popular new addition to the range. The document is available in PDF format here.

If you require clarification or further advice on the hardware or accessories, please let us know. You can email me at Patrick@riamobilegis.com.au.

ArcGIS for Home Use


ESRI Inc have just announced the new ArcGIS For Home Use Program, making it possible for you to take ArcGIS home with you to work all weekend - yay! All jokes aside, if you part of a community group of some description, then this could be just for you. What you get is:
  • A single use ArcView license
  • ArcGIS 3D Analyst
  • ArcGIS Geostatistical Analyst
  • ArcGIS Network Analyst
  • ArcGIS Publisher
  • ArcGIS Schematics
  • ArcGIS Spatial Analyst
  • ArcGIS Tracking Analyst
All for the very reasonable price of $100 (US) per year. Based off the current exchange rate, this means it should cost us around $92.85 is Australia, what a bargain! I wonder how much maintenance will cost?

Anyone who is interested should get in touch with their local distributor.

Wednesday, July 6, 2011

Where are we Heading?


The pace of technological change, and hence Spatial and GIS, appears to be ever increasing. At times it's getting harder and harder to get a clear picture of where we are heading .....
At least thanks to Jack, and his Conference Q&A Session, we can get a few answers and an indication of where things are heading for the ESRI and ArcGIS environment.

(A year is a long time in the technology space, so 2012 may look completely different!!)

100 Posts!!!

Ok so it's not exactly 'Mobile GIS' related, and definitely not as quick as 'Speedy Gonzales', but we've almost made it to 100 Blog Posts!!

We are now mobile & spatially enabled!

What are two things that you think of when someone says mobile GIS? To me, it is pretty obvious... mobile, and spatial. Well guess what, our Mobile GIS blog is now both mobile and spatial. Hooray!

Take a look at out blog from your mobile device. Very pretty!

I have also started defining the location of the blogs. What this means, I don't really know, but I have done it anyway :)

Tuesday, February 22, 2011

Mobile GIS Hardware Review

After several inquiries, a document was prepared in order to provide a clear and concise overview of the most popular units used in the field for mobile GIS applications. It covers a wide range of units, from standard PDAs through to ruggedised laptops, and different brands such as Nomad, GeTac, Panasonic and Xplore. Units have been arranged into classes according to the kind of detailed data they are able to capture. The document also includes approximate prices.
Hopefully this will be a good starting point for people trying to research the best mobile GIS solution for them!
If you would like the PDF, please email me at Patrick@riamobilegis.com.au

Friday, January 28, 2011

ArcGIS 10 GDBT


Those organisations out there that are Monitoring and Reporting on their Corporate GeoDatabase, may be interested to know that the GeoDatabase Toolset (GDBT) has just been released for ArcGIS 10.
Head to the ESRI GDBT Site to access further information.

Wednesday, January 5, 2011

ArcPad 10 Performance Tips

You might have seen a post that I did back in July (ArcPad Drawing Speed), which compared the drawing times of different datasets using ArcPad versions 7.1, 8.0 and 10.0. This research backed up the claims made by ESRI that version 10 has significantly improved performance over previous releases.

There are a few reasons for this. One of which is a new spatial index that is built in AXF files generated using the ArcPad Data Manager Tools for ArcGIS 10. Unfortunately, if you are still using ArcGIS 9.3, the Data Manager Tools have not been updated, and therefore, you will not receive the new indexing.

There is however a way around this:

  1. Generate your AXF file using either the ArcPad Data Manager tools for ArcMap, or ArcToolbox tools
  2. Open up the AXF file in ArcPad 10
  3. Open the Table of Contents, and open the layer properties of the layer you want to index
  4. Switch across to the Attributes page
  5. You will notice that the check box next to the Geometry field will be unchecked. Click it to build the index.
  6. Click OK on the Layer Properties, and OK on the Table of Contents dialog

The indexing will be applied to that layer, in that AXF from that point on (i.e. you do not need to repeat that process each time you start up ArcPad, unless you generate a new AXF file).

Some points to note are:
  • The above is only applicable to line and polygon layers
  • The indexing can only be read by ArcPad 10. It will not be used in 7.1 or 8.0

Thursday, December 23, 2010

Height Enabling ArcPad

Height enabling features (i.e. collecting 3D x,y,z positions) in ArcPad is simple. You just need to make sure that you have (1) your data set up correctly; and (2) correctly configure your hardware.

Configuring your data
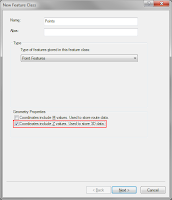
When creating a shapefile or feature class, you must specify that you want to z enable it. From within ArcGIS, this is simply a matter of selecting the "Coordinates include Z values. Used to store 3D data" option on the first page of the "Create new feature class" dialog.
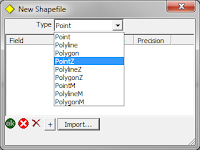
In ArcPad, when creating a new shapefile, you should select the feature type as "PointZ".

Unfortunately, there is no way of z enabling a pre-existing, non z enabled feature class. You must create a new one, import the fields from your previous feature class, then import all of the features across. In this case, any features already captured will not have valid z values. You will need to update these.

Any features from these datasets that are collected within ArcPad will automatically be assigned a z height value at the time of creation. If you digitise a point, a z height of 0 will be assigned. You can easily change this value manually via the geometry page of the edit form if required. If you capture the features using a GPS or laser rangefinder, then provided they are configured correctly to output height coordinates, then these will automatically be assigned to the feature.

Configuring your hardware
This part will probably either be very easy, or a little bit tricky. Basically what you want to do is to make sure that whatever hardware you are using (GPS, laser rangefinder) is outputing data that includes height information. Most GPS units will do this by default. So unless you have gone in to your GPS and altered the messages that are being sent from it, you should be pretty right. If you have played around with the GPS, you will need to dig out your manual and make sure that the height information is being exported correctly.

With laser rangefinders, it should be as simple as making sure that some form of height measurement is being read and exported to ArcPad. For example, you should read the slope distance and inclination to the target. If you export only the bearing and the horizontal distance, then ArcPad has no way of knowing what the change in height from your position to the target actually is.

Accessing the height information
Accessing the height of your points from within ArcPad is also simple. When you create or edit a point, you can switch to the Geography page, which will show the coordinates of the point (including the z height). If you have a line or a polygon layer, it will list all of the coordinates of all of the vertices of that feature.
You can do the same when identifying a feature.

From within ArcGIS, it is not quite so simple. You must add the feature class to ArcMap, start an edit session, use the Edit Tool from the Editor toolbar (the black arrow), double click the point, then open the "Edit Sketch Properties" window. This will list the X, Y, Z coordinates of the selected point (or vertices of a line or polygon).

Another way of viewing this information is to add a float (or double) field to the feature class, then use the "Calculate Geometry" tool in the table view in ArcMap, to calculate the z coordinates of each feature and store that to a field.

Monday, November 22, 2010

ArcGIS & ArcPad 10 SP 1

ArcGIS Version 10 Service Packs have been released.

Download the ArcPad 10 SP1 here. (It is a full ArcPad install)

Wednesday, August 18, 2010

ArcPad Data Manager Toolbar: Select Picture Options (ArcGIS 10)

The ArcPad Data Manager toolbar within ArcGIS 10 has an extra page available during the Get Data for ArcPad (Check Out) process. Within this page the user can identify the picture field(s) within the dataset(s), and also define the location where pictures will be stored during the Get Data from ArcPad (Check In) process.

When field data and photos have been collected in the field and then imported back into the ArcGIS/office environment using the Get Data from ArcPad (Check In) tool, the Picture field(s) are populated using the predefined folder location for Pictures and the name of the image (e.g. D:\MyPhotos\Pictures_0001.jpg).


When identifying a point in ArcMap, the ArcGIS 10 dialog lists the point attributes, with the hyperlink function automatically enabled for Picture fields where an image exists. The user can simply click on the Picture field path and the image will be displayed on screen.